This website requires certain cookies to work and uses other cookies to help you have the best experience. By visiting this website, certain cookies have already been set, which you may delete and block. By closing this message or continuing to use our site, you agree to the use of cookies. Visit our updated privacy and cookie policy to learn more.
This Website Uses Cookies
By closing this message or continuing to use our site, you agree to our cookie policy. Learn More
This website requires certain cookies to work and uses other cookies to help you have the best experience. By visiting this website, certain cookies have already been set, which you may delete and block. By closing this message or continuing to use our site, you agree to the use of cookies. Visit our updated privacy and cookie policy to learn more.
Floor Coverings logo
search
cart
facebook twitter linkedin youtube
  • Sign In
  • Create Account
  • Sign Out
  • My Account
Floor Coverings logo
  • Home
  • Magazine
    • Current Issue
    • FCI Digital Edition
    • Archives
    • Subscribe
  • News
  • Products
    • Flooring Adhesives
    • Hard Surface Installation
    • Soft Surface Installation
    • Underlayment/Cushion
    • Moisture Problems and Solutions
    • Tools
  • Sectors
    • Residential
    • Commercial
    • How-To
  • Columns
    • Namba on Floor Installs
    • CTEF Tile Tip
    • Editor's Note
  • Blog
  • Installation Awards
  • Directory
    • FCI Buyer's Guide
  • More
    • Flooring Installation Resources
    • Flooring Group
    • eNewsletter
    • Calendar of Events
    • The FCI Store
    • Market Research
    • Custom Content & Marketing Services
    • Classifieds
  • Multimedia
    • Videos
    • Webinars
    • Photos
  • Contact
    • Contact Us
    • Advertise
Home » Using Epoxy Adhesives for Resilient Sheet Vinyl
Columns

Using Epoxy Adhesives for Resilient Sheet Vinyl

September 28, 2000
Reprints
No Comments
In commercial sheet flooring installation, the most difficult instllations are those that require epoxy adhesives...

photo 1
In commercial sheet flooring installation, the most difficult installations are those that require epoxy adhesives. Epoxy adhesives are not widely used for installations of sheet flooring material, and require a special attention to detail. The installer needs to understand not only the characteristics and handling of the sheet flooring, but the characteristics of the adhesive as well. Epoxy adhesives have no initial tack, poor grab, extended open times, and they tend to slip around. It is very important for the installer to be familiar with the procedures for installing sheet flooring with an epoxy adhesive.

Homogeneous sheet vinyl needs to be laid out in advance to allow the material to relax. This will stop any distortions from creating undue pressures on the adhesive (photo 1). The epoxy adhesive needs to be mixed thoroughly. Never mix the remnants of one container with the remnants of another. Epoxy adhesives have a narrow margin of error when mixing. This is why it is so important to mix the entire contents of each unit of epoxy (photo 2).

photo 2
When mixing an epoxy adhesive, it is best to use a power mixer to obtain a uniform consistency. This can be accomplished in about two minutes (photo 3).

photo 3
Once mixed, the contents need to be emptied out onto the floor. Epoxy adhesives develop heat and, when left in the container, will set before the installer is ready. Emptying the unit of adhesive out onto the floor and spreading it out eliminates the mass, allowing the adhesive to remain cooler, as well as helping the chemical reaction slow to a more manageable setting time (photo 4).

photo 4
There are three ways to work with the adhesive. After an appropriate open time, anywhere from 20 to 45 minutes, depending on temperature and humidity, the material can then be placed into the adhesive.

For the first method, the adhesive is spread and the material is placed into the adhesive, rolled and pulled out of the adhesive. It is then allowed to stand open to allow the adhesive to develop body (photo 5).

photo 5
Another option finds the adhesive combed into straight lines (photo 6). This allows the air trapped beneath the adhesive to be pushed out from beneath the material. The trapped air is hard to remove because the stiffening adhesive does not allow the air to be easily forced through the adhesive. Placing the material into the adhesive too soon will also result in air bubbles from off-gassing.

photo 6
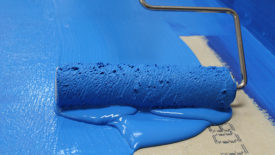
In the final method, the adhesive is spread and then back rolled with a paint roller to remove the ridging left by the trowel (photo 7). The adhesive is left open for the recommended amount of time before the material is placed into the adhesive. The back rolling is supposed to eliminate the air between the ridges in the adhesive, allowing a flatter surface in which to place the material.

photo 7
The placement of the material into the adhesive must be done with a tremendous emphasis on not trapping any air beneath it. This means the material must be slowly placed into the adhesive, and immediately rolled. Some installers will roll the material as it is placed into the adhesive (photo 8).

photo 8
The material should be rolled with a correctly weighted roller, beginning in the direction the adhesive was spread. If the trowel notches run across the width of the material, start the rolling process across the width of the material (photo 9).

photo 9
Immediately after rolling the material in the direction of the trowel notches, roll the material again in the opposite direction. The roller should move in a slow and deliberate path (photo 10).

photo 10
After about one hour, the entire floor should be rolled again in both directions (photo 11). This second rolling will get any areas that were either missed or have come loose. Remember, epoxy adhesives have no grab like a latex or acrylic adhesive. Any areas that are loose or missed will not re-adhere, and will appear as a bubble after the adhesive sets.

photo 11
A final rolling should be done, usually after about three hours. This will get any areas that have come loose. The rolling is usually done with a heavy roller and a hand roller for any difficult areas (photo 12).

photo 12
Epoxy adhesives require a lot of attention to detail, and require experience on the part of the installer. Most of the problems that I have observed are a result of the inadequate open time and/or failure to thoroughly roll the material.

subscribe to Floor Covering Installer

Related Articles

Resilient Installation Corner: Installing Resilient Sheet Vinyl with Epoxy Adhesives

Resilient Installation Corner: Heat Welding Sheet Vinyls

Resilient Installation Corner: Direct Scribing Sheet Materials

FCICA: Installing Resilient Flooring over Cutback Adhesive

You must login or register in order to post a comment.

Report Abusive Comment

Subscribe For Free!
  • Print & Digital Edition Subscriptions
  • eNewsletters
  • Online Registration
  • Subscription Customer Service

More Videos

Popular Stories

Tina and Melissa with Versatrim

A Place for Flooring Distributors to Network

MrDavids-logo

Mr. Davids Flooring International Pioneers New Role For Safety

Laticrete-Prevete

Laticrete Hires Senior Product Manager

Bona-SF-School

Bona US Announces 2020 Bona Sand and Finish Training School Schedule

ICS-logo

Industrial Caulk and Seal Welcomes Director of Accounting

Flooring-Installation-Resources

Poll

What's New in Flooring Adhesives

Have you found that updated adhesive packaging has made your job easier as far as comfort, speed and successful installations?
View Results Poll Archive

Products

Tiling Floors - DVD

Tiling Floors - DVD

Ceramic tiles a versatile and popular material for all kinds of floors. By learning how professional tilesetter Michael Byrne handles the challenges of tiling a watertight bathroom floor and preparing a shower pan, you'll be able to tile any floor in your home, including kitchens, entryways and patios.

See More Products

FCI En Español

FCI: Floor Covering Installer

FCI October 2019 cover

2019 October

In the October 2019 issue of FCI, INSTALL’s executive director John T. McGrath, Jr. and instructor David Gross share key lessons to ensure concrete polishing jobs are done right the first time, every time.

View More Create Account
  • Resources
    • List Rental
    • Survey And Sample
    • Discuss
    • Partners
    • Web Exclusives
    • Polls
    • Privacy Policy
  • Want More
    • Subscribe
    • Connect
  • TalkFloor
  • Advertise With Us
    • Advertise

Copyright ©2019. All Rights Reserved BNP Media.

Design, CMS, Hosting & Web Development :: ePublishing