Photo 1

Photo 2
Photo 1: Homogeneous or heterogeneous sheet vinyl needs to be laid out in advance to allow the material to relax. This will stop any distortions from creating undue pressures on the epoxy adhesive.

Photo 3
Photo 2: The epoxy adhesive needs to be mixed thoroughly. Never mix part of a container with a part of a container. Epoxy adhesives have a narrow margin of error when mixing; this is why it is so important to mix the entire contents of unit “A” with “B” of the epoxy. When mixing the combined units, mix with a paddle stirring with a bottom-to-top motion. Mix until the color is uniform with no marbleized appearance. Avoid the use of a power mixer. The agitation of a power mixer will cause the chemical reaction to speed up and it will also whip air into the mixture.
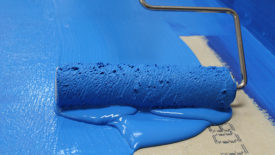
Photo 3: Once mixed, the entire contents of the adhesive needs to be emptied out onto the floor. Epoxy adhesives develop heat and when left in the container will generate high heat and will set before the installer is ready to use it. The act of emptying the unit of adhesive out onto the floor and spreading it out eliminates the mass, which causes the mix to remain cooler and allows the chemical reaction to slow to a manageable setting time.

Photo 4
There are three ways to approach spreading and placing the adhesive into the adhesive. After an appropriate open time, this can be up to one hour, depending upon ambient temperature and humidity, before the material can be placed into the adhesive.
Photo 4: The adhesive is spread and the material is placed into the adhesive, rolled and pulled out of the adhesive and allowed to stand open to allow the adhesive to develop body via the open time. Extreme care must be taken not to trap air beneath the material as the trapped air will create bubbles.

Photo 5
Photo 5: The adhesive is combed into straight lines. This allows the air trapped beneath the adhesive to be pushed out from beneath the material between the ridges of the adhesive. The trapped air beneath the material is hard to remove because the adhesive is starting to stiffen and does not allow the trapped air to be forced easily through the adhesive. Placing the material into the adhesive too soon will also result in air bubbles from off gassing of the epoxy adhesive.

Photo 6
Photo 6: The adhesive is spread with a fine notch trowel and then is back rolled with a short nap paint roller to roll out the ridging left by the trowel. The adhesive is left open for the recommended amount of open time before the material is placed into the adhesive. The back rolling is supposed to eliminate the air between the ridges in the adhesive, allowing a flatter surface in which to place the material.

Photo 7
Photo 7: The placement of the material into the adhesive must be done with the greatest of care not to trap any air beneath it. This means the material must be slowly unrolled into the adhesive and the material rolled immediately. Some installers will roll the material as it is placed into the adhesive. Care also must be taken not to crawl on the material because the knee prints will displace the adhesive allowing a bubble to occur.

Photo 8
Photo 8: The material should be rolled with the appropriate weight roller. First, in the direction the adhesive was spread. If the trowel notches run across the width of the material then start the rolling process across the width of the material. Immediately after rolling the material in the direction of the trowel notches, roll the material again in the opposite direction. The roller should be move in a slow and deliberate path. If you move the roller too fast it will roll over any trapped air.
After about one hour the entire floor should be rolled again in both directions. This second rolling will get any areas that were either missed or have come loose. Remember that epoxy adhesives have no initial grab like a latex or acrylic adhesive. Any areas that are loose or missed will not re-adhere and will remain as a bubble after the adhesive sets.
A final rolling should be done, usually after about two hours. This will get any areas that have come loose. The rolling is usually done with a heavy roller and a hand roller to get any difficult areas.

Photo 9
Photo 9: At the end of the final rolling take some low level lighting and examine the material for bubbles. If any are discovered take a needle and puncture the edge of the bubble on a diagonal and take a hand roller and force any of the air out from beneath the material. Trapped air under the sheet vinyl is compressed and held by the adhesive as it sets. The pressure of the compressed air very slowly forces the material out of the adhesive causing the bubble.
Epoxy adhesives require a lot of attention to detail and require experience on the part of the installer. Most of the problems that I have observed are a result of the inadequate open time and/or failure to thoroughly roll the material multiple times.
Report Abusive Comment