Photo 1: The bonding flange drain is paired with the system’s sloped floor panels which are overlapped by the wall membrane.

Photo 2: To speed the process of waterproofing the sloped floor and drain flange, the author pre-cuts the reinforcing fabric.

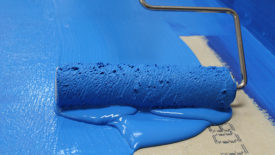
Photo 3: When installing a liquid-applied
membrane, the first step is to apply a base coat of paste, liquid, or gel.
Unfortunately, all of tile contractors I spoke with were not interested at all in a laid-off machinist who did not even know what a mortar bed was. Refusing to give up, I learned there were tile repairmen, so I put Plan C into action and after a couple weeks pounding the pavement, I finally located a contractor who did escrow work and specialized in repairing leaky showers. I was disappointed that mosaic artist was not in my immediate future, but that first humble tile job led me into a lifelong adventure with tile. And that all started because at first, I could not figure out why a tile installation would leak.

Photo 4: The second step is to embed the fabric into the base coat.
Tile has a well-deserved reputation as the most durable of all construction materials, but as I quickly learned, waterproofing depended on the installation – not the tile. Forty-three years ago, 99 percent of all the leaky showers I ripped out were mortar bed installations that used overlapping horizontal bands of tar paper, located behind the mortar bed. Although accepted at the time as reliable waterproofing by some installers, these tar paper bands were really only cleavage membranes, and in many cases, the unsealed overlaps actually promoted leaks caused by the effects of capillary action.

Photo 5: Depending on the brand, the embedded fabric may require one or more coats to finish.
The methods I use now did not happen all at once, but instead, resulted from a series of improvements in available materials and subsequent changes in the methods I used. The first step was to seal the overlaps with cold-patch roofing tar. This helped eliminate capillary action where two bands of tar paper overlapped, and the layer of roofing cement helped seal holes made by staples used to hold reinforcing wire. This technique helped prevent moisture from leaking out of the installation, but I wanted to keep moisture from saturating the mortar beds.

Photo 6: With the shower area finished, the remainder of this bathroom floor can be waterproofed.
The next step was to substitute latex for the water used as the liquid ingredient in mortar beds, thinset mortars, and grouts. Latex grout and mortar additives do not eliminate leaks because they are not designed for that purpose but they will slow moisture penetration considerably.

Photo 7:
The author tapes over the lower drain half to keep mortar out.
These methods helped control leaks and slow down moisture penetration, but with heavy use, all mortar beds will become saturated and this causes problems with mold and mildew which are very difficult to control. The final step I took to minimize leaks and help solve the mold/mildew problem – on either mortar bed or thinbed installations – was to install a surface-applied membrane to the tile setting bed. These membranes work well when installed according to each brand’s instructions, but until recently, joining them to a drain in a tiled shower has been a problem. Today, however, there are accessories and drains that make possible a leak-proof connection between a membrane and drain.

Photo 8: A bonded mortar bed, floated over the concrete, forms the required 1/4-inch-per-foot slope to the drain. The pink circle is the mold used to shape the dished-out area around the clamping drain.
An example of a thinbed shower drain is shown in Photo 1. Called an integrated bonding flange drain, it is a non-clamping drain so shallow that it does not incorporate weep holes in its design, and its flange can be joined to a sheet or liquid-applied membrane system. Shown here with its companion sloped floor panels, the drain is an integral part of this waterproofed, barrier-free shower stall. To build this shower, I began by specifying a dropped subfloor floor in the shower area so that after the sloping panels are installed, the perimeter of the panels is flush with the floor setting bed (Photo 1). For the easiest installation, the connection between the bonding flange drain and the waste line should be done (if there is access) after the sloped panels and drain have been installed.

Photo 9: Once cured, the finished sloped mortar will be the setting bed for membrane and tile.
Waterproofing the sloped floor is done (my preference) after the walls have been covered with a liquid-applied membrane system that laps down onto the floor several inches. The next step is to cut reinforcing fabric sections to fit the space (Photo 2), set them aside, cover the floor and drain flange with a uniform coating of the waterproofing paste (Photo 3), embed the fabric – one section at a time (Photo 4) – and cover the embedded fabric sections with one or more additional coats of paste as directed by the manufacturer (Photo 5). Curing between coats and the completed system is determined by brand instructions.

Photo 10: After the sloped floor cures, the author uses thinset mortar and a compatible sealant to install the drain flashing.

Photo 11: After the drain flashing is secured, the drain’s top half is installed.

Photo 12: Next, the membrane is installed over the flashing.

Photo 13: Once the floor area and upturns are finished, the sheet membrane can be laminated to the walls.

Photo 14: This waterproof shower is ready to tile.
Report Abusive Comment