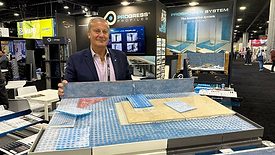
In-floor electrical radiant heat installed under tile floors, floating floors and glue-down hardwood is a hot trend these days. It entered the marketplace some years ago primarily in high-end new construction and renovations, where it has been a popular option under tile, floating floors and laminate in bathrooms, kitchens, family rooms and mudrooms. Now in-floor electric radiant heat is finding favor as a perk in mid-tier and multi-family housing as well as in light commercial, hospitality and residential healthcare facilities.

In-floor electric radiant heat systems are very user friendly—no drafts, noisy fans or blowers, and no moving parts. Unlike hot air systems or hydronic baseboard radiator systems, which heat air and move the heated air around a space, in-floor electric radiant heat warms objects in the room, including people.


Article Index:


Because the systems deliver even, gentle heat controlled at the local level, end users often reap “comfort and cozy” benefits for three—or even four—seasons of the year. In recent years, new technologies for generating and delivering the heat have enabled a variety of affordable systems that feature straightforward installation. In the past, heat wires had to be laid in a mortar bed with the finished floor installed on top (and all the extra steps that required). Now, however, there are products on the market that either roll out or are laid out over a subfloor or on top of underlayment, with the finished floor installed right after.

The systems feature just a few main components: the heating elements (which can be heating cables, heating mats or mesh, or heating film); an in-floor sensor which monitors the temperature of the floor (and typically aims for a setting a few degrees above the room temperature); and a GFCI thermostat, generally wall-mounted, that affords local control.

Residential settings 

The residential target market for in-floor electric radiant heat includes families with babies and toddlers who play on the floor, older homeowners and builders of adult communities where residents would appreciate the extra bit of warmth that in-floor electric radiant heat can provide. It can also be an easy sell for rooms in the house that are at the far end of the zone of the primary heating system. The systems can also be used as gentle heat for rooms otherwise unheated, such as a three-season room, a finished but unheated attic, or a finished but unheated basement.

Systems for tile floors are also available that combine the electric radiant heat elements with underlayment. The underlayment may include an anti-fracture membrane that isolates lateral cracks up to 3/8” in a concrete subfloor from telegraphing through to the tile or grout above. This same type of system can also be used with glue-down wood floors. For wood-frame construction, there are systems designed to be installed under the subfloor, just wide enough to fit between the joists supporting the subfloor.

Commercial settings

In the commercial sector, in-floor radiant heat is an efficient way to provide supplemental heating in offices and other workspaces that, because of location in the building, placement and configuration of windows and other non-controllable factors, could benefit from the ability to activate added warmth to the space. It is also an excellent way to provide additional heat in offices built inside converted lofts, former factories or other high-ceilinged repurposed spaces. Tucked away under the floor, out of sight and operating silently, in-floor electric radiant heat is quieter and safer than space heaters that may hum and can tip over when set up next to or under a desk.

Programmable thermostats can be set to activate the electric radiant heat individually in each office, enabling highly customizable comfort at the start of each work day. Both line voltage and low voltage systems are available, with power consumption measured by wattage output per square foot. The standard wattage density is 8–12 watts per square foot, an expenditure that does not exceed warranty requirements for most floating floors.

Many systems are tested and UL (Underwriters Laboratories) listed, UL-Canada ETL or CSA (Canadian Standards Association) listed. Typically, they are easy to install, requiring the services of a licensed electrician only for the final hookup of lead wires at the junction box to the power and the thermostat. Typically, the systems are maintenance-free. Some are also certified to UL 1683 (requirements covering fixed electric heating products for installation under floor coverings and above a subfloor, in accordance with NEC, NFPA 70, Article 424, for use on system voltages not exceeding 600V).

Types of products

Products that feature mats or rollout film come in a variety of sizes, making it easy to fit the system to a room layout, especially those with irregular spaces or spaces broken up by interior walls and partitions. In the current crop of systems, some manufacturers offer products that feature elements that are very thin and don’t detectably raise the level of the finished floor.

While some systems feature cables that cannot be modified, others are engineered so the electric elements can be cut, potentially enabling coverage of a greater percentage of the floor surface with minimal effort and minimal waste. For example, some systems feature heating elements laid out in parallel on the pad, which can be cut between the parallel heating elements. This type of system also affords the advantage that if one section is damaged or compromised, the rest of the elements continue to heat.

Layout and installation

While products that provide even, gentle heat are designed to be safe for finished flooring, it is always a good idea to check with the flooring manufacturer to determine compatibility and warranty of their products before installing over floor heat. Before starting any installation, read the instructions that come with the system. In addition, often manufacturers have step-by step videos of how to install their systems posted on their websites.

By UL requirement, electric radiant heat must be kept a minimum of at least 6” away from the outer edges of permanent structures and fixtures, including all walls; and in bathrooms 6” away from tubs, water closets and other bathroom fixtures. If the installation includes a floor sensor to monitor the temperature of the floor, be sure to install it before starting to install the finished flooring.

A typical installation of a rollout system would pretty much proceed along the lines of the steps below and may or may not include underlayment designed to enhance the overall performance of the particular type of finished floor. Underlayment well-matched to the type of finished floor can improve acoustics in the room, provide additional insulating value and good compression resistance that supports more comfortable walking. It can also provide moisture management that helps protect wood, engineered wood, laminate and luxury vinyl flooring from moisture that can adversely affect the finished floor. Under laminate, underlayment designed for that flooring can absorb the click sounds commonly associated with the material and help the finished floor sound more like real wood.

The following steps are what you can expect to encounter when working with an in-floor electric radiant heating system. Always follow manufacturer instructions for proper installation.

  1. Clean the subfloor so it is free of any debris and make sure the subfloor fasteners are secure and won’t protrude above the surface of the subfloor. The subfloor can be wood, concrete, backer board, or OSB. If the subfloor is concrete, it may be necessary to lay down a vapor barrier and then construct a second subfloor over it, especially if the subfloor is at or below grade.
  2. Draw a sketch of the best layout of the panels, including the locations of the floor sensor, the thermostat and the junction box. Plan to position the panels so that the factory-attached wires at the ends of each are on the same side of the room as the junction box.
  3. If you are including underlayment (fiber, cork, foam or rubber) in the floor assembly, install it now over the entire floor area, butting the seams.
  4. Roll out the panels, mats or film and fit them into the layout. Systems that come in various lengths and widths offer the advantage of minimizing waste and/or cutting to fit.
  5. Make a channel for the wires to run from the mats or panels to the location of the junction box.
  6. Recess the wires and duct tape them securely into place.
  7. Run all the lead wires and the floor sensor wire to the junction box.
  8. If the system includes an in-floor sensor, install it now.
  9. Once the wires are at the junction box, the electrician can test the floor circuits and connect the wires.
  10. As soon as the system is tested, the installer can lay the floor.

An affordable supplemental heat system easily installed under new flooring, in-floor electric radiant heat systems can be a profitable addition to many flooring jobs.